Wallboard, commonly known as drywall or gypsum board, is a versatile building material used for constructing interior walls and ceilings. Despite its durability, wallboard can become damaged due to various reasons such as water infiltration, physical impact, and settling of the building. Understanding the type and extent of damage is crucial before initiating repairs. In this blog post, Specialized Drywall OJ INC helps to explore common forms of damage include cracks, holes, dents, and water damage, each requiring specific repair techniques.
Assessing the Damage
Before beginning any repair work, it is essential to thoroughly assess the damage. Minor dents and small holes can often be fixed with simple patching, while extensive water damage might require replacing entire sections of the wallboard. Use a flashlight to inspect the area closely, looking for signs of mold or mildew, which could indicate more severe underlying issues. Tap the wall lightly to check for hollow sounds that suggest hidden damage behind the surface.
Assessing the damage to wallboards involves a thorough inspection to identify issues like cracks, holes, or water damage. Prompt assessment helps in determining whether repair or replacement is needed. Repairing damaged wallboards typically involves filling holes with joint compound, sanding smooth, and applying primer and paint. For larger damage, replacement may be necessary, ensuring proper sizing and installation for structural integrity. Professional wallboard services offer expertise in assessing, repairing, and replacing wallboards to maintain the integrity and aesthetic appeal of interior spaces effectively.
Gathering Materials and Tools
Repairing wallboard requires specific materials and tools to ensure a professional finish. Basic materials include joint compound, drywall tape, patching kits, and replacement wallboard pieces if necessary. Essential tools for the job include a utility knife, drywall saw, sanding sponge, trowel or putty knife, and a screw gun or drill. Safety gear such as gloves, goggles, and a dust mask should also be used to protect against dust and debris.
Preparing the Work Area
Proper preparation of the work area is crucial for a successful wallboard repair. Start by removing any furniture, decorations, or obstructions near the damaged area. Cover the floor with a drop cloth to catch dust and debris. Use a utility knife to carefully cut away loose or damaged wallboard around the repair area, ensuring clean and straight edges. If the damage is due to water infiltration, make sure the source of the water is fixed before proceeding with the repair.
Repairing Small Holes and Dents
Small holes and dents are the most common types of wallboard damage and are relatively easy to repair. Begin by cleaning the damaged area to remove any loose debris. For small holes, apply a pre-mixed joint compound with a putty knife, spreading it evenly over the hole and feathering the edges to blend with the surrounding wall. For dents, simply fill the indentation with joint compound and smooth it out. Allow the compound to dry completely, then sand the area lightly to achieve a seamless finish.
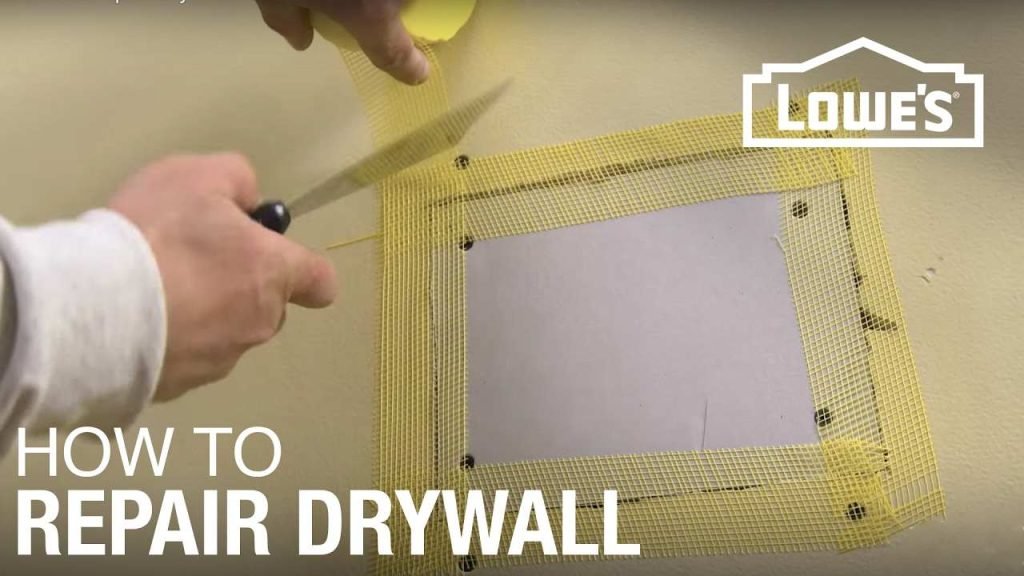
Patching Medium-Sized Holes
Medium-sized holes, typically larger than a quarter but smaller than a fist, require a patching kit or a piece of wallboard. Start by cutting a piece of drywall to fit the hole precisely. Use a drywall saw to cut out the damaged area, creating a clean, square opening. Apply joint compound around the edges of the hole and press the patch into place. Secure the patch with drywall screws, ensuring it is flush with the surrounding surface. Cover the seams with drywall tape and apply a layer of joint compound over the tape, feathering the edges. Once dry, sand the area smooth and apply additional coats of joint compound as needed.
Fixing Large Holes and Sections
Large holes and extensive damage require more comprehensive repairs, often involving the replacement of entire sections of wallboard. Begin by measuring and cutting a piece of drywall to fit the damaged area. Remove the damaged section by cutting along the studs, using a drywall saw. Install the new drywall piece by securing it to the studs with drywall screws. Apply drywall tape to the seams and cover with joint compound, feathering the edges to blend with the existing wall. Multiple coats of joint compound may be necessary to achieve a smooth finish. Once dry, sand the area and inspect for any imperfections that need additional attention.
Addressing Water Damage
Water damage to wallboard can be particularly problematic as it often leads to mold growth and structural issues. If the damage is minor, such as small stains or surface bubbling, it can usually be repaired by removing the affected section and replacing it with new drywall. For more severe water damage, it is crucial to address the source of the water before proceeding with repairs. Cut out the damaged wallboard, allowing the area to dry completely. Treat any mold with a commercial mold remover and install new drywall. Ensure the new wallboard is moisture-resistant if the area is prone to water exposure.
Finishing the Repair
Once the damaged wallboard has been repaired or replaced, the next step is to finish the repair to match the existing wall. Sand the repaired area smooth, removing any rough edges or imperfections. Apply a primer to the patched area to prepare it for painting. Use a high-quality paint that matches the existing wall color, applying it with a roller or brush for an even finish. Depending on the extent of the repair, you may need to paint the entire wall to ensure a uniform appearance.
Ensuring Longevity of the Repair
To ensure the longevity of your wallboard repair, take preventative measures to protect the walls from future damage. Address any structural issues in your home that could cause settling or movement, which may lead to cracks. Install bumpers or guards in high-traffic areas to protect the walls from physical impact. If water damage was the issue, ensure proper ventilation and moisture control in the affected areas. Regularly inspect your walls for any signs of damage and address them promptly to prevent more extensive repairs.
Ensuring the longevity of repairs involves using high-quality materials, thorough preparation, and expert craftsmanship. For wallboard installation, this means selecting durable gypsum board, ensuring proper joint treatment, and applying suitable finishes. Investing time in meticulous installation techniques reduces the need for future repairs, extending the wallboard’s lifespan.
Professional vs. DIY Repairs
Deciding whether to repair wallboard yourself or hire a professional depends on the extent of the damage and your comfort level with DIY projects. Small repairs, such as fixing dents and small holes, are typically straightforward and can be handled by most homeowners. Larger repairs, especially those involving water damage or extensive sections, may require professional expertise to ensure the job is done correctly and safely. Consider your skill level, available time, and the cost of materials and tools when making your decision.
Professional wallboard repairs in Sioux Falls, SD, ensure precise techniques and quality results, addressing common issues like cracks, water damage, and holes effectively. Experts use specialized tools and materials, ensuring lasting repairs that maintain structural integrity and appearance. DIY repairs may suffice for minor issues but lack professional finesse and long-term durability. Understanding common wallboard problems guides homeowners in deciding whether to engage professional services for comprehensive repairs and peace of mind.
Common Mistakes to Avoid
When repairing wallboard, it is essential to avoid common mistakes that can compromise the quality of the repair. One common mistake is failing to properly prepare the surface, which can result in joint compound not adhering correctly. Another mistake is using too much joint compound, which can lead to an uneven finish. Not allowing sufficient drying time between coats of joint compound can also cause problems, as can improper sanding techniques. Take your time with each step of the repair process to ensure a professional finish.
Final Inspection and Touch-Ups
After completing the wallboard repair, conduct a final inspection to ensure the area is smooth and blends seamlessly with the surrounding wall. Check for any visible seams, rough spots, or areas that need additional sanding or joint compound. Apply touch-ups as needed, and once you are satisfied with the repair, clean up the work area. Remove any protective coverings, dispose of debris, and return furniture and decorations to their original positions.
Maintaining Your Wallboard
Regular maintenance of your wallboard can prevent future damage and prolong the life of your walls. Keep an eye out for early signs of damage, such as small cracks or stains, and address them promptly. Avoid hanging heavy objects without proper wall anchors, and be cautious when moving furniture to prevent accidental impacts. In areas prone to moisture, use dehumidifiers and ensure proper ventilation to prevent water damage. By taking these preventative measures, you can keep your wallboard in excellent condition for years to come.
Maintaining your wallboard ensures longevity and aesthetic appeal in your Sioux Falls home. Regular inspection for cracks or moisture damage helps prevent costly repairs. Proper cleaning with mild solutions keeps surfaces pristine. Linking maintenance with the benefits of hiring a local Sioux Falls wallboard service ensures expert handling of repairs, efficient upgrades, and adherence to local building codes. Trusting local professionals in Sioux Falls, SD, ensures quality craftsmanship and peace of mind for your home’s interior integrity.
FAQs
How do you fix badly damaged walls?
Yes, usually water damaged drywall can be repaired by using a paint scraper to remove all the peeling paint, then sanding the wall with increasingly small grit. Finally, prime and paint the drywall and wait until it’s dry.
How do you fix cracks in wallboards?
- Remove Loose Paper and Obstacles.
- Find the Stud.
- Add Screws to Stabilize the Crack.
- Apply the Adhesive Spray.
- Apply the Mesh Tape.
- Add the Drywall Compound.
- Add More Coats of Drywall Compound.
- Sand the Patch.
What is the easiest way to repair a wall?
How to Repair Drywall and Patch Holes in the Wall …
Follow the steps below to quickly fix any small imperfections in your wall. Scrape away any loose residue, such as chipping paint. Cover with Spackle, and smooth with a putty knife to make it level with the wall. Once the Spackle is completely dry, after usually 1–2 hours, sand and paint.
How to repair a damaged wall without plastering?
Following are the steps to repairing a crack in drywall :
- Buy a joint compound that can either be premixed or ‘setting-type’
- Cut a V-notch along the cracks you want to fix.
- Clean the area around the crack to remove debris or dust.
- Apply a thin layer of joint compound to the crack and spread it evenly.
What is used to fix walls?
All you’ll need is some spackle or joint compound (aka “mud”), a small putty knife and a sanding block. Dealing with a sizeable hole? You will likely need more than the bare necessities. Anything larger than a nail hole often requires mesh drywall tape to strengthen and hold the drywall mud in place.
Conclusion
Repairing damaged wallboard can be a manageable DIY project with the right tools, materials, and techniques. By understanding the different types of damage and following a systematic approach, you can restore your walls to their original condition and maintain the aesthetic and structural integrity of your home. Whether you choose to tackle the repairs yourself or hire a professional, addressing wallboard damage promptly and effectively will ensure your home remains in top shape.