Master the Art of a Smooth Finish—Even If It’s Your First Time
When you’re hanging drywall, the final look all comes down to one thing: how well you tape and finish the joints. Sure, the installation matters, but even perfectly hung drywall will look messy if the seams aren’t handled right. Whether you’re remodeling a single room or tackling a whole-house renovation, learning the proper drywall taping techniques can make the difference between a flawless wall and a bumpy mess.
Don’t worry—you don’t need to be a pro to get professional-looking results. With the right tools, some patience, and our easy-to-follow guide, you’ll be able to tape, mud, and finish your drywall tape joints like a champ. This guide walks you through every step, from choosing between paper drywall tape and mesh drywall tape to avoiding common mistakes like drywall tape bubbles or poor corner joints. Let’s dive in!
Start With the Right Tools and Materials
Before you begin, make sure your toolbox is ready. Having the correct supplies can make your job a whole lot smoother.
Here’s what you’ll need:
- Drywall joint tape (paper or mesh)
- Drywall joint compound (aka mud)
- Taping knife (6”, 10”, and 12”)
- Corner trowel (for inside corners)
- Mud pan or hawk
- Sanding block or sponge
- Utility knife
- Clean cloth
If you’re not sure which materials to get, check out Specialized Drywall for professional-grade tools and expert Sheetrock services.
Understanding Drywall Tape: Paper vs. Mesh
One of the first decisions you’ll face is whether to use paper drywall tape or mesh drywall tape. Each has its perks—and some drawbacks—depending on your project.
- Paper drywall tape is strong and has a natural crease down the center, making it perfect for drywall tape corner joints. It holds up better in fire-rated assemblies and offers a clean finish.
- Mesh drywall tape is easier for beginners to use because it’s self-adhesive. It’s great for flat seams but can be more prone to cracking if not embedded properly with enough drywall joint compound.
For a stronger bond and better finish, many pros recommend sticking with paper tape—especially if you’re aiming for a long-lasting result.
Prep the Surface Like a Pro
Before applying any tape, your drywall seams should be clean and dry. Any leftover dust, screws that are too proud, or debris can prevent the tape from sticking or cause uneven finishes.
Go over the joints with a drywall taping knife and make sure:
- Screws are flush or slightly recessed.
- The surface is free from debris or chunks.
- Joints are tight but not overly packed with compound.
Once everything’s clean and smooth, you’re ready to move on to the drywall tape application.
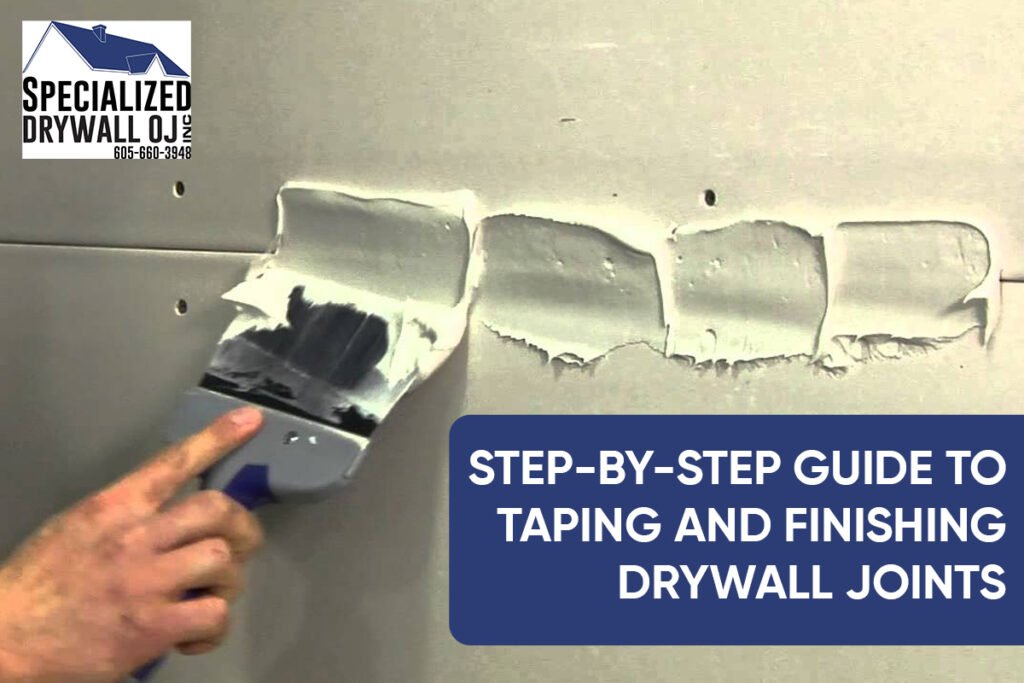
Apply the First Coat of Mud and Tape
Now comes the part where it all starts to come together—drywall tape and mud time! This step requires a steady hand, but it’s not hard once you get into the rhythm.
Flat Joints:
- Using a 6-inch knife, apply a thin, even layer of drywall joint compound over the joint.
- Place your drywall joint tape (paper or mesh) directly onto the wet mud.
- Press the tape into the compound with your knife, holding it at a 45-degree angle.
- Smooth out any excess mud, working out air pockets to prevent drywall tape bubbles.
Corner Joints:
- Crease paper tape down the middle and fold it into the corner.
- Apply compound on both sides of the corner using a corner trowel.
- Place the folded tape and embed it with a knife or corner tool, smoothing from the inside out.
Let this first coat dry completely—typically 24 hours.
Feather and Layer for a Seamless Look
Once your first coat is dry, it’s time to build up layers to create a seamless wall surface. This is where many DIYers either shine or struggle, but don’t worry—we’ve got your back.
Second Coat:
- Use a 10-inch taping knife.
- Apply a wider coat over the first pass, feathering the edges out about 2–3 inches past the original.
- Be gentle. Your goal here is to add coverage, not thickness.
Third Coat:
- Switch to a 12-inch knife and apply the final skim coat.
- Extend the edges even farther, creating a smooth gradient between the joint and the wall.
- Scrape off any excess mud and check for imperfections.
Patience here pays off—so take your time to let each layer dry before applying the next.
Sand Smooth Without Overdoing It
Now for the satisfying part—sanding. After your mud has fully dried (about 24 hours after the final coat), use a sanding sponge or pole sander to smooth things out.
Pro tips:
- Use light pressure. Don’t sand down into the tape.
- Keep the light angled across the wall to spot bumps and dips.
- Clean up dust with a damp cloth or vacuum before painting.
Overstanding is a common mistake, so be gentle and let your tools do the work. Check out our friends at Specialized Drywall for expert finishing tips and professional help if you’re tackling a large space.
Troubleshooting Common Taping Mistakes
No one gets it perfect the first time, but knowing what to watch out for helps. Here are a few common drywall taping issues and how to fix them:
- Drywall tape bubbles: Caused by poor adhesion or air pockets. Slice the bubble open, reapply compound, and smooth it out.
- Cracking: Usually due to too little mud under mesh tape. Remove the affected section, and re-tape using more compound.
- Visible seams: Likely caused by too little feathering. Re-skim the joint with a wider knife and sand after drying.
Need more help? Read this complete guide to patching and repairing Sheetrock walls for expert repair advice.
Pro Tips to Speed Up the Process
Want to save time and still get a great finish? These time-saving tricks will help:
- Use a mud pan to keep your compound smooth and consistent.
- Work from top to bottom to avoid drips.
- Mix your compound to a creamy texture for easier application.
- Use a light pole sander for large areas to avoid arm fatigue.
If you’re short on time or doing a large remodel, hiring a professional can save hours of effort and deliver pristine results.
Final Thoughts: Your Path to a Perfect Wall
Taping and finishing drywall might seem tricky at first, but once you get the hang of it, it’s pretty satisfying. From mastering the drywall tape joint to learning how to avoid drywall tape bubbles, you’re now equipped to take on your next project with confidence.
Remember, the key to success is in the prep, patience, and layering. Whether you’re patching a hole or finishing a full remodel, these drywall taping techniques will guide you to pro-level results. And if you ever feel overwhelmed, don’t hesitate to reach out to the experts at Specialized Drywall for help or professional Sheetrock services.
FAQs: Taping and Finishing Drywall
Q1: Should I use paper or mesh drywall tape?
Paper tape is stronger and best for corners; mesh is easier to apply but can crack if not embedded properly.
Q2: How many coats of mud do I need?
Typically, three coats: one to embed the tape and two for feathering and finishing.
Q3: How long does the mud need to dry between coats?
24 hours per coat is ideal, though fast-drying compounds can shorten this time.
Q4: Why is my drywall tape bubbling?
Air pockets or dry mud under the tape. You may need to cut, re-mud, and reapply the tape.
Q5: Can I paint directly after sanding?
Not quite—wipe down the dust first, then use a primer before painting to ensure smooth coverage.